A Dummies’
Guide to Working with Wall Warts
By John H. Bryant,
with Bill Bowers
edited version, January 2005
I’ve often been frustrated
by my lack of understanding of the simplest electronic
device that any of us possess: the ubiquitous “wall
wart” plug-in power supply. I must confess
that when I have co-authored technical articles
in the past, the emphasis is very much on the “co.”
In such projects, I generally perform as scribe,
editor, graphic artist and all-around cheerleader,
while relying on my partner to supply the essential
technical expertise and applied creativity. Thus,
when faced with a continuing need for small external
power supplies of specific voltage or RF cleanliness,
I have been at the mercy of the rather insanely
high prices charged for such things at Radio Shack
or other electronic parts outlets; all the while,
I was accumulating a whole drawer full of spare
wall warts, orphaned from various long-forgotten
consumer and hobby devices.
 |
In case you aren’t familiar
with the slang term “wall wart,” that
refers to the seemingly solid block brick that plugs
into the AC mains electrical wall outlet and provides
DC power to various consumer devices from cell phones
through medium-sized radios to many computer peripherals.
Typically, a good consumer-grade wall wart contains
a transformer to reduce normal mains voltage to
the range needed by the device to be powered. Once
the mains AC power is lowered in voltage, it is
run through a solid-state “bridge” (four
diodes) or “full-wave” (two diodes) rectifier
to be converted to DC. This is usually followed
by a single filter capacitor. The power is then
piped out through twin wires of appropriate size
to carry the current at the designed power level.
It is my understanding that some very inexpensive
wall warts do not contain even rudimentary filter
capacitors. Avoid these, if possible.
Being rather desperate for some
small power supplies about a year ago, I finally
worked up the courage to admit my ignorance about
such things to long-time friend Bill Bowers. I asked
him to develop some notes for me, so that I could
create both adjustable and fixed voltage DC power
supplies from my drawer of wall warts. This was
about like asking a NASCAR driver to give you tips
on parallel parking, but Bill kindly complied. In
the last few months, I’ve loaned copies of
these notes to several hobbyist friends, some of
whom are technically astute and others, dummies
like me. Both sets of folks have found Bill’s
notes very useful, so I am encouraged to share them
more widely. What follows are Bill’s notes,
data and circuit diagrams (redrawn by me) along
with my running commentary.
Cautions
At its simplest, there are three
possible outcomes to a project like this and two
of them are BAD. When energized, there is some 120
volt AC (or more) electricity wandering around in
what you are working on… Be careful, or you
might fry yourself… or at least knock your
heart out of rhythm. I hate it when that happens.
BE CAREFUL!
A second bad outcome is the possibility
of frying the device that you are hoping to power
with your newly modified wall wart. DC current has
a positive and a negative leg and it is very easy
to get them reversed (reversed polarity.) Often,
this will literally fry the device that you hope
to power. I take a very direct approach to checking
for proper polarity at the end of one of these wall
wart projects: I keep an unmodified wall wart around
and I check its polarity first, using a small cheap
analog volt meter. I pay close attention to which
meter probe, red or black, that I use on the inner
and outer parts of the DC connector and I note which
direction the meter pointer swings. I then repeat
the same test on my newly modified wall wart. That
approach may seem both simple-minded and paranoid,
but I’ve made too many sad mistakes to do otherwise.
BE CAREFUL!
The third possible outcome of
one of these simple projects is VERY GOOD: you create
a voltage-regulated, RF-clean, fixed or adjustable
voltage DC power supply for about $5.00 worth of
parts and less than an hour of easy work. BE JOYOUS!
Discussion
Most wall warts are manufactured
to power a single small solid-state electronic device
and are usually designed to supply DC power. This
article focuses entirely on wall warts that supply
DC. Unless the wall wart happens to be one of those
few that also provides voltage regulation, the DC
voltage measured at the DC tip of the device can
be between 15 and 20 VDC, when there is no load
on the wall wart. As load is applied to the circuit,
the voltage drops proportionally. Thus, if a wall
wart is rated at 12 VDC and 500 ma., the voltage
will be significantly above 12 VDC when the supply
is powering a device that only uses 200 or 300 milliamps
of current. Similarly, the voltage will drop well
below the specified 12 volts if more than 500 milliamps
of current is needed by the device to be powered.
Cheap wall warts have a second
weakness of concern to us: although they usually
have a single filter capacitor inside the case,
they are still somewhat dirty devices from an RF
point of view and can produce all sorts of buzzing
and other artifacts at the frequencies on which
we normally DX. Most often, this is caused by “ripple”
in the DC current created by the rectifier…
Ripple is a less than smooth, steady value for the
voltage and or current produced when plotted over
time. It may be thought of and measured as vestigial
AC current downstream from the rectifier and is
often a cause of serious noise in RF-related circuits.
Unless you are interested in DXing your new power
supply and QSLing yourself, adding filter capacitors
to your Wall Wart project is very worthwhile.
So, since we usually want to
power an auxiliary device at a steady specified
voltage and since we usually need a very clean power
supply, what I wanted Bill’s help on was in
creating a filtered, regulated power DC supply.
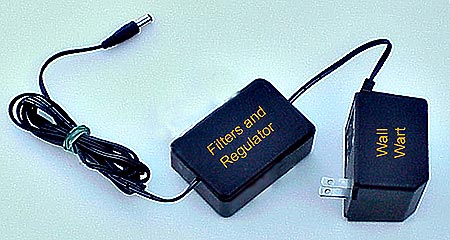
We accomplished this by adding a module between
the wall wart and its DC output plug that contained
a fixed or adjustable voltage regulator and a network
of filter capacitors.
Voltage Regulators
 
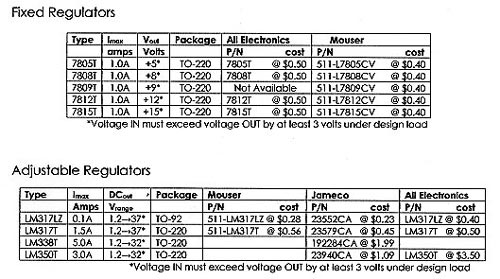
Bill recommended using two families
of small integrated circuit voltage regulators for
our more common applications: the 78xx family of
fixed voltage regulators and the LM3xx family of
adjustable regulators. Both of these families are
popular in commercial and hobby applications and
are manufactured in great numbers; hence, they are
all quite commonly available and very low cost.
A grid of reference information for each family
which follows:

Filtering
Most electronic devices have
some kind of filtering, usually accomplished with
multiple capacitors, to remove 60 and 120 cycle
ripples from the DC electrical current powering
them. Most wall warts do contain filtering, but
it is usually far less than adequate for our purposes,
either because the device that the wall wart was
designed to power did not require filtered power
or because the majority of the filtering for the
original device was done inside the device itself.
In these kinds of circuits, it
is good practice to place filters capacitors both
before and after the regulator. Bill suggests using
470µf electrolytic caps that are rated at
50 volts for this application. These are commonly
used in computers and many other low voltage circuits
and are often “almost free” when bought
in bulk. In Bill’s two suggested circuits,
these are twinned (paralleled) with .1µ caps
and, in critical RF circuits, they are followed
by a .001µ cap, as well. If possible, Bill
also recommends placing a small (.1µ or .01µ)
capacitor between the positive bus and ground, just
inside the box of the device to be powered. This
will ground any stray RF that might be picked up
by the DC lead running from the regulator circuit
to the circuit to be powered.
When I was building the first
of my circuits, I found that the only small 50 volt
electrolytics in my junk box were 100 µf units,
far smaller than the suggested 470 µf caps.
I talked to Bill and he felt that the 100µf
units would likely suffice. They did, in that particular
application. However, I now routinely use the suggested
470µf caps for general applications. As I
understand it, there is almost no such thing as
too much filtering.
Circuit for Fixed Voltage

Circuit for Adjustable Voltage

For R2, I prefer to use a small
screw-adjustable trimmer resistor by Bournes. This
particular design is screw-adjustable from the top
and, as with all Bournes pots, is veerrry smooth.
From Mouser, the part number is 652-3296Y-1-502
and the price in December 2004 was $2.00.
Some hobbyists may feel that
the filtering network suggested in both of the above
circuits is a bit excessive. For some applications,
that is undoubtedly true. However, given the critical
nature of some of our circuits and the disastrous
affects that 60/120 cycle buzz can have on weak
signal DXing, I tend to err on the conservative
side. After all, the component costs of this design
are literally pennies apiece, so more filtering
is generally better.
Selecting an
Appropriate Wall Wart
Using
wall warts as a basis for power supplies should,
for all sorts of reasons including fire safety,
be limited to supplying devices that need no more
than .100 to .150 amperes of current at the specified
voltage. If your device requires more current than
that, we strongly recommend either buying or building
a complete regulated power supply. Thanks to modern
components, these are relatively simple devices,
with designs, components and complete supplies being
readily available.
Within the range of regulated
supplies requiring 100 to 150 milliamperes or less,
the primary concern in selecting a wall wart is
to make sure that it will supply power at least
3 volts DC in excess of the desired final controlled
voltage, when the circuit is running at the designed
load. This "3 volts in excess" comes from
the basic needs of the voltage regulator itself.
The most straight-forward approach to selecting
a wall wart for your project would be to select
one with an amperage rating that matches your needs
and a voltage rating that is 3 or 4 volts higher.
Thus, if you need a 5 VDC, 100 ma. regulated supply,
you might select a used "9 VDC" wall wart
rated at 100 or 150 ma. If you need a 9 volt regulated
supply at 70 ma., you might select a small "12
VDC" wall wart rated at 100 ma.
The selection becomes a bit more
complex, if you desire a 12 volt regulated supply.
One way to go is, as discussed above, to use a 14,
15 or 16 VDC wall wart rated at least as large as
your design load in milliamperes. However, these
wall warts though less common are readily available
from JAMECO and other supply houses for from 3 to
8 dollars. The other design strategy for building
a small, filtered and regulated 12 VDC supply is
to take advantage of the unregulated nature of wall
warts. Remember that a wall wart rated at 12 VDC
and 300 ma. will actually supply significantly more
than 12 VDC at loads smaller than its rated load
in milliamperes. So, if you need a regulated 12
VDC at 150 ma., a wall wart that is rated 12 VDC
at 300 ma. would likely supply at least the requisite
15 volts to your new regulator at the 150 ma. load
level. The only way to be sure is to measure the
voltage output under the load you expect to use.
Some published diagrams of wall
warts show a fuse in the circuit. None of the units
that we cut open had fuses. If your application
requires a fuse, you'd better incorporate it in
the same box with the regulator and capacitors.
It was also noted in all the wall warts that were
opened they all did contain a filter capacitor but
it varied from 50 to 1000 uf, with most containing
a 100 uf capacitor. Unless you plan to cut open
your wall wart, then adding the suggested capacitors
looks like a good idea.
Heat
Dissipation
Like most devices
dealing with power, voltage regulation tends to
create heat. In our case, the more reduction in
voltage accomplished by our regulator and the higher
the current, the warmer the regulator gets. At loads
around 100 ma. and dropping the voltage only 3 volts,
the heat generated is only .3 watts. However, the
amount of heat generated builds up rather quickly
as one moves to higher currents or deeper voltage
drops. Happily, all general electronics houses stock
small heat sinks designed specifically to snap on
the body of our "TO-220" shaped regulator.
Since they only cost between $0.15 and $0.30 USD
each, we strongly suggest snapping one of these
devices on the regulator, no matter what the projected
current draw. Further, knowing that heat generation/dissipation
is a concern with power supplies, common sense would
dictate normally using a metal box and making sure
to provide cross-ventilation by drilling a few holes
in the case.
John, being a "hands-on"
type, does not put his regulation/filtering modules
into a case until after he hooks the entire circuit
up to the device needing power and lets it run for
a while. If the regulator and its little heat sink
get warm, it is relatively easy to use common sense
to determine what kind of enclosure and ventilation
strategy, if any, is needed. This kind of careful
in-use testing of your newly modified wall warts
is strongly recommended.
Testing and
Use
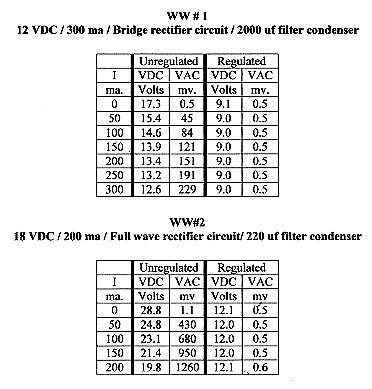
Bill ran a series of measurements
on two wall warts to demonstrate the effects of
the new regulation/filtering module. Both sets of
measurements used a variable voltage module that
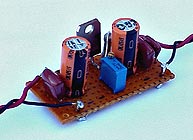
I assembled from Bill’s second schematic. That
particular module is also the one used in the photo
illustrations at the end of this article. Two wall
warts were tested. Each wall wart was tested from
0 ma. to its rated current capacity. The output
voltage, VDC, and ripple voltage, VAC, were measured
with a Fluke-45 Dual Display Voltmeter. The “Regulated”
values were obtained using the new filter/ regulator
circuit.

Looking at the Unregulated VDC
column in both grids, you can see the very unregulated
nature of most wall warts, with the maximum voltage
(minimum load) on each over 75% above the rated
voltage. Comparing the Unregulated Voltage to the
Regulated Voltage of each unit certainly illustrates
the effectiveness of our voltage regulator. The
Unregulated VAC (the “ripple voltage”)
columns of each are quite interesting. When comparing
the two, you can see the effects of the more efficient
bridge rectifier in WW#1 and its much larger than
usual single filter capacitor. It is likely, though,
that the remaining 200 or so millivolts of AC would
induce a 60/120 cycle storm in our more critical
uses. The 1260 millivolt ripple
In WW#2 is probable more typical (and scary!) As
you can see, the new filter circuit only allows
one-half of one-thousandth of a volt of AC ripple
to pass through our circuit. Finest kind!
Recently, I’ve used Bill’s
first circuit to make up several fixed voltage supplies
for various uses. However, as a normal procedure,
I plan to prefabricate generic adjustable units
rather than fixed voltage, single-use units. My
approach is to order parts for five of the adjustable
modules at once and build them all, as a group,
on small pieces of 1” x 2” perf board.
Then, when I need one, I’ll drop it in the
box, attach the wall wart and set the voltage with
a digital multimeter. Fifteen minutes work and I’ll
ready to roll.


Other Uses
If you have managed to read this
far, you have almost certainly realized that these
two circuits have uses far beyond harnessing the
power of wall warts. For most of my own career as
a MW and SWBC DXer, I’ve DXed almost as much
from a vehicle (“12 volt DXing”) as I
have from a formal radio shack. These circuits are
just the thing, of course, to convert the power
from one or two deep-cycle batteries to the various
lower voltages required by some pieces of peripheral
DXing equipment.
Suppliers
Mouser
Electronics - All
Electronics - Jameco
first published on
DXing.info on December 28, 2004,
this edited version published on January 20, 2005
  
|